How Do You Smooth a Stippled Ceiling
It’s not uncommon for homeowners to want to smooth a stippled ceiling. This can be done for aesthetic reasons or because the homeowner is planning on painting the ceiling and wants a smooth surface. There are a few different ways that this can be accomplished, and the best method will depend on the specific situation.
Stippled ceilings are a type of textured ceiling that has been around for decades. They were popular in the 1970s and 1980s, but fell out of favor in recent years. However, stippled ceilings can be made to look fresh and modern with the right approach.
If you’re thinking about smoothing a stippled ceiling, here’s what you need to know.
The first step is to identify the type of stipple you have. There are two main types: popcorn stipple and orange peel stipple.
Popcorn stipples are raised and have a more three-dimensional texture, while orange peel stipples are flatter and have more of a skin-like texture. Once you’ve identified the type of stipple, you can proceed with smoothing it.
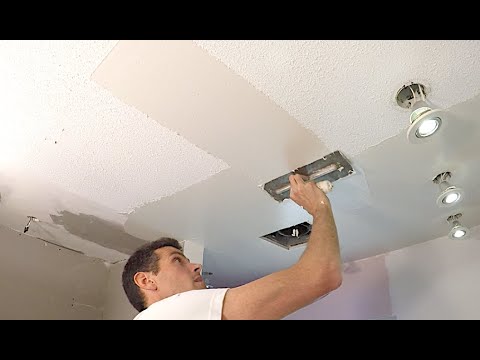
If you have a popcorn stipple, you’ll need to use a putty knife or other scraping tool to remove the raised bumps.
Start by gently scraping off any loose pieces, then apply pressure to flatten the remaining bumps. You may need to go over the area several times to get all of the bumps flattened.
For an orange peel stipple, start by sanding down the surface with medium-grit sandpaper until it’s smooth.
Then Vacuum away any dust particles created by sanding . Next , using either a paint roller or sprayer , apply an even layer of joint compound over the entire ceiling . Allow this coat to dry completely before applying another one .
Depending on how thick your original orange peel texture was , it may take 3 – 4 coats of joint compound to completely smooth out your ceiling .
Credit: www.youtube.com
Can I Smooth Out Textured Ceiling?
If your ceiling is textured, you may be wondering if there’s a way to smooth it out. The good news is that yes, you can smooth out textured ceilings! The bad news is that it’s not a quick or easy process.
Textured ceilings are usually made by spraying a thick layer of joint compound onto the ceiling and then using a special brush or roller to create the desired texture. Once the joint compound dries, it’s very difficult to remove without damaging the underlying drywall.
The best way to smooth out a textured ceiling is to hire a professional drywall contractor who has experience dealing with this type of project.
They will know how to properly sand down the textured surface without damaging the drywall underneath.
If you’re determined to tackle this project yourself, you’ll need to rent some heavy-duty sanding equipment and have patience for what will undoubtedly be a long and messy process. Start by wetting down the area you’ll be working on – this will help keep dust levels down.
Then, slowly and carefully start sanding away at the texture until it’s gone. You may need to go over the same area multiple times to get all of the texture removed.
Once you’ve got the majority of the texture removed, you can finish up with a finer grit sandpaper until the surface is completely smooth.
Then comes painting – another job best left to professionals unless you’re confident in your DIY skills!
Can You Skim a Stippled Ceiling?
A stippled ceiling is a type of textured ceiling that has been around for many years. It is made by applying a thin layer of joint compound to the ceiling and then using a special tool to create the desired texture. The most common textures are orange peel, splatter, or knockdown.
Stippled ceilings can be painted or left unpainted, depending on your preference. If you decide to paint your stippled ceiling, it is important to use a good quality primer prior to painting. This will help ensure an even finish and will also help hide any imperfections in the texture.
If you are looking for a unique way to add interest to your home, a stippled ceiling may be the perfect option!
How Do You Update a Stippled Ceiling?
If your home has a stippled ceiling, you may be wondering how to go about updating it. Stippling is a textured finish that was popular in the 1970s and 1980s, but has since fallen out of favour. If you’re looking for a way to update your stippled ceiling, here are a few options:
1. Paint over it: This is the simplest and most cost-effective option. Use a good quality primer and paint in your desired colour. You may need to use several coats of paint to completely cover the stipple texture.
2. Replace it: If painting isn’t an option or you simply don’t like the look of stipples, you can replace the entire ceiling. This is a more involved project, but will give you a fresh start with your ceiling design.
3. Remove it: Another option is to remove the stipple texture altogether.
This can be done by sanding down the surface until smooth.
How Do You Remove Stippled Texture from a Ceiling?
If your ceilings are stippled, you may be wondering how to remove the texture. Although some people enjoy the look of stippled ceilings, others find them outdated or difficult to clean. If you’re in the latter camp, you’ll be happy to know that there are a few ways to remove stippled texture from your ceiling.
One way to remove stippled texture is by using a steam machine. This method is effective but can be time-consuming and labor-intensive, so it’s best suited for large projects. To use a steam machine, start by filling the tank with distilled water and attaching the hose to the nozzle.
Then, hold the nozzle close to the surface of the ceiling and slowly move it back and forth until all of the texture has been removed. Be sure to keep moving the nozzle so that you don’t scorch or damage the ceiling surface.
Another way to remove stippled texture is by using a chemical stripper.
This method is also effective but can be harsh on both your skin and lungs, so it’s important to take precautions when using it. To strip your ceiling with chemicals, start by covering any exposed skin and opening all of the windows in your workspace. Then, apply a generous amount of stripper evenly across the surface of your ceiling with a paintbrush or roller.
After letting it sit for several minutes, use a putty knife or other scraper tool to scrape off as much of thetexture as possible.
How to Smooth a Textured Ceiling
How to Remove Swirl Textured Ceiling
If your home was built in the 1970s or 1980s, chances are good that it has a “swirl” textured ceiling. This was a popular style at the time, but many people now find it dated and unattractive. Fortunately, there is a relatively easy way to remove this texture and give your ceiling a smooth, modern finish.
Here’s what you’ll need:
-A putty knife or other sharp scraping tool
-A garden sprayer or pump up sprayer
-Water
-Drywall compound
-A sanding block (optional)
Swirl Textured Ceilings – How to Remove
It’s estimated that over 50% of homes built in North America between 1960 and 1985 have stipple ceilings also known as “orange peel” or “popcorn” ceilings. These types of ceilings were very fashionable during that time period however; many homeowners now find them outdated and would like to remove them.
Although removing these types of ceilings can be quite messy, time consuming and require some physical labour; the results are definitely worth it giving your home a more modern updated look. Below we will explain how you can go about removing your own stipple ceiling.
How to Cover Textured Ceiling
If your home has a textured ceiling, you may be wondering how to best go about painting it. Here are some tips to help you get started.
1. Choose the right paint.
A high-quality latex paint is typically the best choice for a textured ceiling. You’ll want to avoid oil-based paints, as they can be difficult to work with and don’t always provide good coverage.
2. Prepare the surface.
Before you start painting, it’s important to properly prep the surface of your textured ceiling. This means using a primer specifically designed for use on texture surfaces. This will help ensure that your paint job looks even and covers all of the nooks and crannies in the texture.
3 . Use a roller designed for textured surfaces . When it comes time to actually paint your ceiling, be sure to use a roller specifically designed for use on textures .
This type of roller will have thicker nap (the fabric covering) , which will help ensure even coverage .
4 . Be patient .
Painting a textured ceiling can be a bit more time-consuming than painting a smooth surface , so be patient and take your time . It’s better to do multiple thin coats than one thick coat , as this will help avoid any drips or sags in the finish .
Smooth Ceilings Why is It an Upgrade
When it comes to your home, there are a lot of different ways that you can choose to upgrade the look and feel. One way that is becoming increasingly popular is to install smooth ceilings. Here are some of the reasons why this is an upgrade worth considering:
1. Smooth ceilings provide a clean look. If you’re looking for a way to make your home’s interior look more polished and put-together, smooth ceilings are a great option. They create an illusion of more space and can make even small rooms seem larger.
2. Smooth ceilings are easier to clean than textured ones. Whether you have dust allergies or simply don’t enjoy cleaning, this is a big advantage! Not only do smooth ceilings require less effort to keep them looking good, but they also won’t collect as much dust over time.
3. Smooth ceilings can help reduce noise levels in your home. If you live in a busy area or have loud family members, this can be a lifesaver! The smoother surface helps absorb sound waves rather than reflecting them back into the room, which can make a big difference in overall noise levels.
Roll on Smooth Ceiling Texture
Are you looking for a way to add some visual interest to your ceilings? If so, then you may want to consider using a roll on smooth ceiling texture. This type of texture can give your ceilings a unique look that is sure to impress.
There are a few things to keep in mind when choosing a roll on smooth ceiling texture. First, you will need to decide what level of texture you want. This can range from very light to very heavy.
Next, you will need to select the right color for your needs. The color should complement the rest of the room’s decor. Finally, you will need to choose the right size roller for the job.
Once you have all of these things sorted out, it’s time to get started! Begin by painting the entire ceiling with a primer coat. Once this has dried, start rolling on the smooth ceiling texture evenly across the surface.
Be sure to work in small sections so that the texture does not become too thick in any one area. Allow the textured paint to dry completely before moving on to another section or adding any other decorative touches (such as wallpaper).
Conclusion
There are a few different ways that you can smooth a stippled ceiling. One way is to use a putty knife to fill in any holes or cracks. Another way is to sand the ceiling down with fine-grit sandpaper.
You can also use a power washer to remove any debris from the surface of the ceiling.